The powerful Attiny Arduino
It was by chance I discovered Attiny Arduino devices. Due to the prize and size of the device could be a really powerful discovery for small and low-cost projects. But this is not an Arduino like the others, it is a small one so it could be a bit difficult to use the first time. So let’s see what can we do with that.

Programming process
In order to program this device it is necessary to use another Arduino. In this case I will use an Arduino Leonardo. It will be used as a ISP (In system programmer) programmer. The steps to follow:
- Install Arduino Leonardo
- Configure Arduino as a ISP programmer.
- Add Attiny libraries to Arduino IDE.
- Wire Attiny with Arduino Leonardo ISP.
- Programm Attiny.
1) Install Arduino Leonardo
It is possible to install Arduino IDE in Linux, Mac and Windows. In this case I would choose Windows because for me it has been impossible to install under Linux. It is one thing I should have a look.
1.a) Windows
Go to Arduino web page and choose windows option in this case. Just open the Windows installation and left it installing. At this very moment I would use Arduino 1.0.5 that is the last release.
2) Configure Arduino as a ISP programmer.
After installing the Arduino IDE you have to program it as an ISP programmer. For that choose the programmer as and in “Archive” choose “Sketchsbook” inside choose “ArduinoISP”. In this part you have to replace the line that says :
#define RESET SSby
#define RESET 10that would define pin 10 as reset. In tools board choose “Arduino Leonardo” and press upload. This would end with your Arduino programmed as a ISP programmer.
You have to configure your Arduino as a programmer for Attiny. In order to avoid some problems it is necessary to define a new programmer with a different programming protocol. Just open this folder “/windows/Program Files (x86)/Arduino/hardware/arduino/programmers.txt” and add at the end:
################################################################33
arduinoispleo.name=Arduino as ISP (Leonardo)
arduinoispleo.communication=serial
arduinoispleo.protocol=arduino
arduinoispleo.speed=19200
3) Add Attiny libraries to Arduino IDE
Arduino doesn’t support Attiny by default so it is necessary to add some libraries. First of all download the libraries smeezekittyÔÇÖs core13 and for Attiny 45 here in case you want to install both just download this file Attiny_15_45_85. Copy this libraries inside /windows/Program Files (x86)/Arduino/hardware/arduino/cores/core13 for the first file and /windows/Program Files (x86)/Arduino/hardware/arduino/cores/ for the second one. If core13 folder doesn’t exist create it. Finally add to the end of the file /windows/Program Files (x86)/Arduino/hardware/arduino/boards.txt :
################################################################
attiny13.name=Attiny 13A standalone
attiny13.upload.using=arduino:arduinoisp
attiny13.upload.maximum_size=1024
attiny13.upload.speed=19200
attiny13.bootloader.low_fuses=0x7B
attiny13.bootloader.high_fuses=0xFF
attiny13.bootloader.path=empty
attiny13.bootloader.file=empty
attiny13.bootloader.unlock_bits=0xFF
attiny13.bootloader.lock_bits=0xFF
attiny13.build.mcu=attiny13a
attiny13.build.f_cpu=128000
attiny13.build.core=core13
################################################################
attiny13int.name=Attiny13 @ 128 KHz (internal watchdog oscillator)
attiny13int.upload.using=arduino:arduinoisp
attiny13int.upload.maximum_size=1024
attiny13int.upload.speed=250 # important for not losing connection to a slow processor
attiny13int.bootloader.low_fuses=0x7B
attiny13int.bootloader.high_fuses=0xFF
attiny13int.bootloader.unlock_bits=0x3F
attiny13int.bootloader.lock_bits=0x3F
attiny13int.build.mcu=attiny13
attiny13int.build.f_cpu=128000
attiny13int.build.core=core13
###############################################################
attiny13at4.name=ATtiny13 @ 4.8MHz (internal 4.8 MHz clock)
attiny13at4.upload.using=arduino:arduinoisp
attiny13at4.bootloader.low_fuses=0x69
attiny13at4.bootloader.high_fuses=0xff
attiny13at4.upload.maximum_size=1024
attiny13at4.build.mcu=attiny13
attiny13at4.build.f_cpu=600000
attiny13at4.build.core=core13
###############################################################
attiny13.name=ATtiny13 @ 9.6MHz (interne 9.6 MHz clock)
attiny13.upload.using=arduino:arduinoisp
attiny13.bootloader.low_fuses=0x7a
attiny13.bootloader.high_fuses=0xff
attiny13.upload.maximum_size=1024
attiny13.build.mcu=attiny13
attiny13.build.f_cpu=1200000
attiny13.build.core=core13
###############################################################
attiny45usbtinyisp.name=ATtiny45 (w/ USB Tiny ISP)
attiny45usbtinyisp.upload.using=arduino:usbtinyisp
attiny45usbtinyisp.upload.maximum_size=4096
attiny45usbtinyisp.build.mcu=attiny45
attiny45usbtinyisp.build.f_cpu=1000000L
attiny45usbtinyisp.build.core=attiny45_85
###############################################################
attiny45arduinoisp.name=ATtiny45 (w/ Arduino as ISP)
attiny45arduinoisp.upload.using=arduino:arduinoisp
attiny45arduinoisp.upload.maximum_size=4096
attiny45arduinoisp.build.mcu=attiny45
attiny45arduinoisp.build.f_cpu=1000000L
attiny45arduinoisp.build.core=attiny45_85
###############################################################
attiny45avrisp.name=ATtiny45 (w/ AVRISP mkII)
attiny45avrisp.upload.using=arduino:avrispmkii
attiny45avrisp.upload.maximum_size=4096
attiny45avrisp.build.mcu=attiny45
attiny45avrisp.build.f_cpu=1000000L
attiny45avrisp.build.core=attiny45_85
###############################################################
attiny85usbtinyisp.name=ATtiny85 (w/ USB Tiny ISP)
attiny85usbtinyisp.upload.using=arduino:usbtinyisp
attiny85usbtinyisp.upload.maximum_size=8192
attiny85usbtinyisp.build.mcu=attiny85
attiny85usbtinyisp.build.f_cpu=1000000L
attiny85usbtinyisp.build.core=attiny45_85
###############################################################
attiny85arduinoisp.name=ATtiny85 (w/ Arduino as ISP)
attiny85arduinoisp.upload.using=arduino:arduinoisp
attiny85arduinoisp.upload.maximum_size=8192
attiny85arduinoisp.build.mcu=attiny85
attiny85arduinoisp.build.f_cpu=1000000L
attiny85arduinoisp.build.core=attiny45_85
###############################################################
attiny85avrisp.name=ATtiny85 (w/ AVRISP mkII)
attiny85avrisp.upload.using=arduino:avrispmkii
attiny85avrisp.upload.maximum_size=8192
attiny85avrisp.build.mcu=attiny85
attiny85avrisp.build.f_cpu=1000000L
attiny85avrisp.build.core=attiny45_85
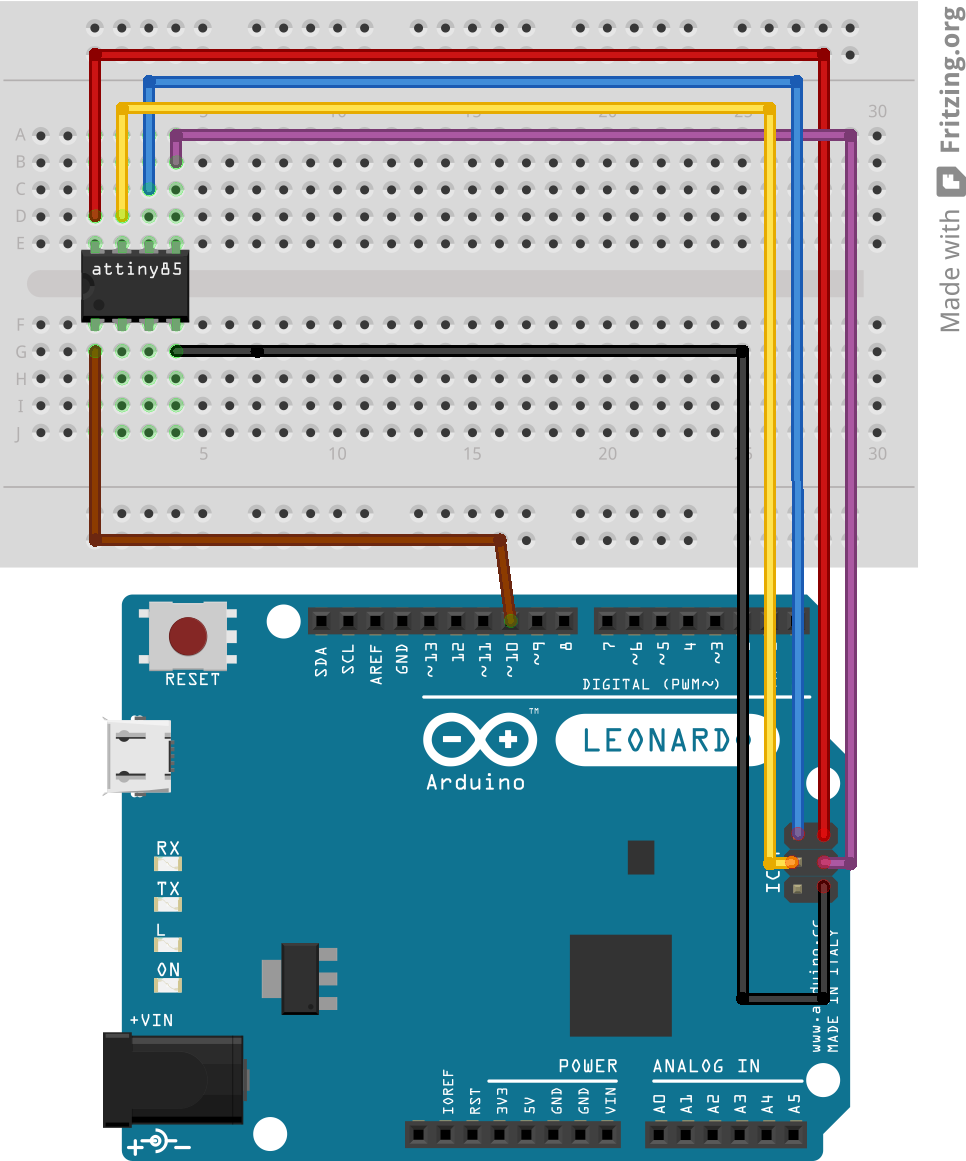
###############################################################4) Wire Attiny with Arduino Leonardo ISP.
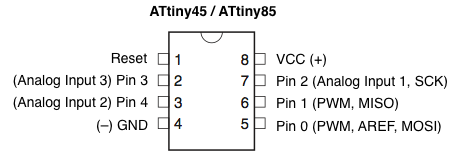
In order to wire Attiny13 you can follow this diagram taking in account that reset is pin number 10 as it is showed.
5) Program Attiny
The last but not the least is programming Attiny13. Just select, for example, the blink example setting up the proper output pin :
// the setup routine runs once when you press reset:
void setup() {
  // initialize the digital pin as an output.
  pinMode(led, OUTPUT);
}
// the loop routine runs over and over again forever:
void loop() {
  digitalWrite(led, HIGH);   // turn the LED on (HIGH is the voltage level)
  delay(1000);               // wait for a second
  digitalWrite(led, LOW);    // turn the LED off by making the voltage LOW
  delay(1000);               // wait for a second
}
Select “Tools”, “Programmer” and “Arduino as ISP (leonardo)” and choose Attiny13 in “Tools”, “Board” , “Attiny13@…”. Finally add a led to the 0 pin in this case and upload the file to the Arduino Attiny13.
6) Where to go from here
Now I am ready to create a touch button to switch on and off the Raspberry pi.